Tuesday, January 29, 2013

Faux Marbling with Shaving Cream How Too / Tipnique Tuesday


Morning everyone
so yesterday I put my hand into all those tips and techniques I have collected over my paper crafting years and I pulled out "Faux Marbling" and smiled. This is an old old technique and brings back fond memories of playing with this with my children when they were small. As my eldest is now 22 that was way back LOL.

MATERIALS
  • Shaving cream-any brand and in fact cheap brands seem to work best
  • Re inkers, spray inks, thinned paint etc or even food colouring works
  • Gladbake or other protective surface paper
  • A plastic tray big enough for Q6 or even up to A4 paper size
  • An old credit card or palette knife
  • Skewer or end of a paint brush
  • Paper towel
  • Gloves or you don't like ink stained hands
  • White or pale coloured mat card stock cut big enough to fit in your tray. Gloss will work but comes out with a paler effect. Sturdy 300gms card stock works well
HOW TOO
(1) Place a sheet of Gladbake on your work surface. Place tray on top. Shake shaving cream and squeeze about 1cm deep into the tray. You don't have to fill the whole tray base just enough for the size of your card stock.


(2) Use the old credit card or palette knife and smooth over the surface.


(3) Add drops of colour. In this one I used Alcohol inks by Ranger. I use 1-3 colours only and think about your colour theory as they will mix and can get muddy looking.


(4) Now drag the skewer back and forth and in circles thru the mix to make a marble effect. What a colourful mess LOL. I'm sure I have seen paintings that are considered fine art that look like this :o).


(5) Place card stock on the surface. I find the best way to do this is to gently bend the card stock in the center upward to make a "U" shape and place the bend on the surface first and then gently press the two ends down as well. Gently press card all over at the back to make sure it has full contact with the surface.


(6) Slowly peel the card stock back up and place it on the Gladbake. It looks good enough to eat!


 (7) Scrap off excess back into your tray with the credit card and then blot off any remaining shaving cream with a paper towel. Tada beautiful marble looking hand coloured card stock. If you haven't got full coverage you can place the card stock back on the shaving cream and try again. Card stock will bend up and then flatten once dry.


(8) Flatten the shaving cream and repeat the above steps. Each print will be lighter and the colour more mixed. When you don't like the effect anymore rinse the shaving cream off  and start again.

Well that's it and then you can stamp on top or layer images etc and have the marbled bg showing thru. As I had all the stuff out to do this I decided to go all out and try things with any colours within reach. The next two I have used two Adirondack dye ink re-inker colours and the yellow was a Colorbox pigment ink re-inker.


I even sprayed gold Perfect Pearls spray on top of the shaving cream before I put the card stock down for this one.


This next batch I used Vivid dye ink re-inkers.


This is the first pull up colour on the card stock.


See how the colours are less intense with subsequent pulls of card stock?.


This patch I used Radiant Rain sprays. I shook them, took the lids off and splattered the colour around.


Its hard to capture the glimmer in photos but the effect was pastel coloured shimmer!!


After a few pulls the base colour was mainly pale blue so I added some more drops of the Radiant Rain on top but didn't mix them in this time and placed my card stock straight on top.


And got this.


My last pull of colour was very pale so I jazzed it up. Where my Radiant Rains had been sitting some of the ink had puddled around the circular bases of the bottles...so I used the base of bottle to twist into the settled colours and stamped coloured rings on top.


This one is done using just one colour of ink only


This is a finished card made from one of my faux marbled back grounds


So there you have it faux marbling. I would love to see what anyone makes with this. Positive thoughts to all my family and friends in QLD. I'm hoping the weather improves soon for you all and you are all safe and not affected by flooding. Oh dang sorry if you read this earlier with all the spelling mistakes LOL...I type looking down....I think I have all the errors fixed now :o).
hugs
Annette In Oz
Tuesday, January 22, 2013

Types of Inks and how they differ-a brief guide/ Tipnique Tuesday

Hi all
well my puffy steam punk heart is still awaiting time for me to play with it...one thing lead to another and I just never got back to it. Last week I was trying to make some space to have a go at playing with the heart as my desk had been swallowed up with Christmas papers and colours. In doing so I rediscovered three draws of old paper crafting how too's and techniques. I've put them all in a folder now and was thinking of revisiting some at regular intervals this year and sharing them here. Some will be VERY simple and easy yet just maybe new to others. Some will be just a tip and others a technique.
I remember when I first started playing with paper crafts being overwhelmed by which type of inks did what so here is a brief difference description of a few commonly used ones. There is a vast amount more then the ones I shall talk about but this is just a taster...

Pigment-Based Inks
Pigment inks are slow drying, which makes them the perfect ink to use when you want to emboss with powders. Embossing powder is sprinkled on top of the stamped pigment ink, shake off excess and heat with a heat gun or over a toaster till the powders melt...it leaves a shiny raised surface. Be careful if you don't emboss as they can stay wet and easily smudge for days. Stamps will slide easily if you try to stamp on a gloss card with pigment inks. Clean up is with water/wash up liquid or a stamp cleaning solution. Examples of pigment-based inks include Adirondack Pigment Inks by Ranger Industries, ColorBox by Clearsnap, Craft Stampin’ Pad by Stampin’ Up!, VersaColor and Brilliance inks by Tsukineko
Versafine Ink by Tsukineko is an oil based instant dry pigment ink. It is water resistant so can be used on water colour papers and will keep a well defined stamping edge when you add colour to your image. It dries too quick for embossing well.
Versamark ink pad by Tsukineko is a very thick ink. The ink stays wet longer when stamped and chalk, pearl ex powder etc can be dusted on top. They will stick where the ink has been stamped and you just gentle dust away the excess with a soft brush. You can also stamp on gloss card and brayer or stipple on coloured inks over the top and the stamped image will resist the colour applied giving a ghost effect. Stamp on coloured card to create a watermark effect. Its also an excellent ink for applying embossing powders too.
 
Dye-Based Inks
Dye-based inks dry quickly and are heavily pigmented. This makes them ideal for quick stamping on card stock, paper, and many other surfaces when you don’t want the ink to smear. Best used on porous surfaces. They are water soluble though and will leach out if water is dropped on top. Generally they dry too quick for embossing powders to be added on top. Cleaning the ink of the stamp is easily done with water and paper towel or even a little dish wash liquid, water and a paper towel. You can tap a paint brush on top and dip it in water and paint with them. Smoosh the pad on a craft mat, spritz it with water and press card stock on top for yummy bgs etc etc.These are the types of inks you will find in most ink jet printers.
Examples of dye-based inks include: Distress Ink and Adirondack inks by Ranger Industries, and Vivid dye inks by Clearsnap and Memories by Stewart Superior Corporation
There are fast drying dye inks that are more resistant to water. They are water resistant or waterproof when dry so can be used on porous and non porous surfaces. They can stain stamps and you will need a stamp cleaning solution to clean stamps. Examples of these sorts of pads are Ancient Page Dye Ink by Clearsnap and Memories India Ink Black Dye Ink by Stewart Superior

Solvent-Based Inks
Solvent-based inks are designed for stamping on nonporous surfaces, which makes them ideal for projects involving metal, acrylic, glass, glossy photos, Vellum and transparencies. It will stain your stamps and must be cleaned off stamps using a solvent based cleaner. It's what I use when I want an ink resist for etching metal. An example of solvent-based inks include StazOn by Tsukineko and the ink in Sharpie markers.


 Then there is the whole world of types of paper and card stocks. Generally paper crafters use 180-300gms card stock. It depends on how sturdy you want the base card. The higher the grams on the card stock the thicker and sturdier the card will be. Gloss card is used for printing photos on, stamping photo stamps on and making bgs with inks and sprays etc. Gloss card can be very cheap(inks sit on surface and doesn't sink in well which is good for doing ink jet transfers) or expensive which lets the ink sink in more and making the images less likely to be affected by water and other mediums. Watercolour paper comes in different grams and will be rough(cold pressed) or smooth (hot pressed). Its absorbent and there are many many ways to use it.
Then there are coated papers, Valiums (films), tissue papers, hand made papers and so on...the list is really endless. A lot of the time with paper and card stock its more about getting some and have a play and see what you can do for yourself with them. The same is true with the vast amounts of inks and ink pads out there. I've only mentioned a mere few. All usually have info re the ink type, its use and how to clean up afterwards on the back as a guide. There really is no right and wrong and many techniques using inks have been discovered simply by people playing outside those guidelines. My little guide is the tip of the iceberg so just Google away if there is more you want to know.

I've always bought the re inker at the time I buy a new stamp pad and that's a BIG tip I pass on. It's darn annoying when your ink pad runs dry and you have no re inker!. To re ink you just add drops on the surface of the pad and gently massage in the ink with the nozzle of the re inker or re ink as per manufacturer guidelines. You can even buy blank stamp pads and make your own ink pads if you want. Not everyone does but I also store my ink pads upside down so the ink is more likely to be on the surface when you need it. ALSO if your ink pad comes with a covering film or plastic cover on top of the pad KEEP IT. Remove it for stamping and then put it back on. If you get sick of removing and reapplying it just place some double sided tape under the lid to attach it in place and you want even have to think about it. My last tip with ink pads is if they come loose from the base you can glue them back down with Super Glue even if they are wet with ink. Hope this helps someone :o).
hugs
Annette In Oz

Sunday, January 20, 2013

Steampunk card-Just playing

I had a play with some mixed media things tonight and using a photo stamp called Maribel by Stempelglede that I had but had never used. As I've been playing with jewellery a lot more then papercrafts the hardest part for me was remembering how to get the right amount of ink on the stamp! Eventually the Brayer and my Stazon ink were the answer. My photograph is a bit lop sided sorry :o)


The details closer...


And a closer look at the image which I think is modern and gorgeous!


Must get that steam punk heart out next which I haven't touched since my last post despite good intentions. Having an absent hubby makes me very busy and some days I just don't get "me" time.
hugs
Annette In Oz


Tuesday, January 8, 2013

SEW it begins

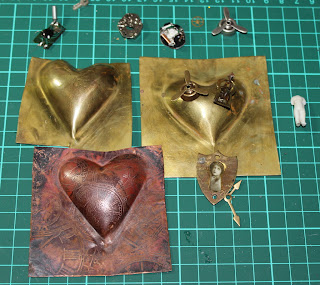
It's Tuesday!! I love Tuesday and Friday as they are my days off. If I get the housework (sorry for swearing *grin*) done in good time I get to steal a little time for myself in my tiny art space located in my spare room. Today I wanted to get a start on some more steampunk heart necklaces...the universe heard me and I have three puffy hearts awaiting their(and mine) destiny LOL.


This one is copper that I have hand etched and then puffed. I'll keep this one aside for now as the first one I want to make I want it to be very similar to my original one here


This is the one I will work on today. I've filled a little brass keyhle that I got from Jen Crossley's shop with Ice Resin and tiny watch cogs and I think I may use this movable brass propeller? 


My first and only steampunk heart necklace took me  a week to nut out so I am hoping I can still remember the lessons I learnt doing that one so this one wont take as long! If and when I get it made I will gift it to someone special whom I know is a lover of steampunk like me. And so it begins...

While I was working at my desk I kept getting distracted by a gorgeous embossed metal egg that Grant got me from an antique shop in Adelaide. As I have said in the past getting anything antique, of good quality and good price in Darwin is impossible so I was a kid in a candy shop when we visited antique shops while I was away...the only problem was I had very little money to spend!! Grant wanted to buy me a few things with his money for me for Christmas and this was one item I chose.

The lady who sold it to me wasn't sure exactly what it was. This morning I Googled it and its a vintage thimble holder (hence my "sew" post title LOL) that was likely attached to a Chatelaine...a waist hanging Victorian keepsake holder...it would have things such as the pantry key, glasses holder, retractable pencil, stamp holder box, Etui(sewing kit) etc attached to the waste clasp with chains. I can't see any makers marks on mine and I am not sure what the silver colour metal is but I just love this treasure. You press the little spring button and it opens. The twisted vintage looking safety pin its hanging from is my own handmade faux vintage pin :o). In my research I also discovered this is worth ALLOT more then Grant paid for it... I had ideas to alter this and make it into a necklace but that idea is now scraped!!


The inside is polished silver looking


 and the outside has this gorgeous floral design on it.


A closer look at the brass detail from front and back.


Another thing that costs me an arm and a leg to get in Darwin is vintage pen nibs so I was very excited to be able to buy a whole box full of them from another antique shop using my Christmas money from Grant and at a great price too.


My last treasure was a beautiful piece of carnival glass in the form of a tray. The little porcelain bird I bought at an art shop on Kangaroo Island. I nearly forgot I also got an antique small shoe polish tin with shoe polish still in it as well....hhhmmm where have a I put that LOL?


I'm sure I'll find it sooner or later. Now I solved the mystery of the little metal egg and the washing is done I'm off to continue on the steampunk heart necklace journey.
hugs
Annette In Oz


Sunday, January 6, 2013

2013 Already!!

Well time has flown by hasn't it and here we are in 2013 already!. Some where in amongst all the Physio, hydrotherapy, doctors appointments and just being busy looking after 5acres, pets and 17 yr old son on my own "spare time" got gobbled up LOL in the last 6-8 weeks. Actually I had created quite a few cards in November and December but as all were made in a rush I darn forgot to take any photos of anything. Silly me. I even managed to make 80 simple Christmas cards. No matter how limiting this darn left shoulder was I still couldn't bring myself to send bought cards.

So happy late Christmas and New Years and may 2013 bring you all love, laughter, creativity and joy. I spent a lovely 2 weeks in Adelaide over Christmas. Time went way too fast and I did so much. My lovely daughters and their partners gave Grant and I an overnight stay on Kangaroo Island as our Christmas present. Such a beautiful and inspiring place. Just having Christmas with all my little family was amazing enough but to get to go to Kangaroo Island as well...well I am blessed. On boxing day we all went to seethe  Cirque Du Soleil show "Ovo". That too was bloomin amazing and I would encourage anyone to go if they can. All too soon the heart wrenching time came for Tim and I to come home again without Grant *sigh*. I'm putting this out to the Universe "please get Grant Husband home to the NT soon"...hope that works. I'm still sorting photos from the trip but when I can I'll upload some here.

Sadly I have come home to my dear elderly fluff ball Milo's deterioration.

 
  He is still happy but had started peeing inside. He had always been an inside dog and went to the door when he needed to go outside to do his business but now he doesn't go to the door and  just does huge wees in the hall. Dilemma and then some. I'm pretty sure he has big sight, hearing and teeth issues(he usually has one tooth and his tongue hanging out from the side of his mouth) but he doesn't appear to be in any pain or discomfort and is still eating well. So he now lives mainly on the veranda...poor boy...he comes to the door wagging his tail and puts a paw on the screen to ask to be let back in a zillion time....and sadly the door stays closed. I'm thinking a last vet visit is in the near future but not without Grant being here!! It's sssoo hard to let your old pets go!!

On a good note while I was away the pain improved greatly from my last shoulder operation. So much so I have started to grab time in the art room again. I spent several hours yesterday making arty farty backgrounds for future cards. It was amazing to be able to create relatively pain free at last!


On Tuesday I have another day off and I will dedicate some of the day to trying to get some more puffy steampunk hearts made at last. I did try on and off in last few months but it was still too painful at those times to put too much pressure thru my arm. I'm hoping that too has now past....I've missed my jewellery making :o)

Before I go I wanted to show you all a little frog that came visiting on my washing machine last night. He is a Litoria Rothi or northern laughing frog,

 
It makes me happy to hear and see frogs for whatever reason. Its also pretty awesome that I can now take decent photos with my decent camera Grant gave me for my birthday in November. Grant also gave me a flash for the camera at Christmas so I should be able to take decent art/jewellery shots from now on too :o)
hugs
Annette In Oz

LinkWithin

Related Posts Plugin for WordPress, Blogger...